I might have by no means dreamed, taking part in Tremendous Mario Bros. on my NES, that online game graphics would look as advanced and lifelike as they do right now. However right here we’re: from HDR to real-time ray tracing, 3D graphics are extra mind-blowing than ever. However for those who ever wished your recreation seemed just a little sharper, just a little brighter, or just a little extra colourful, you now have the instruments to customise your recreation’s graphics to your liking, because of a software referred to as Nvidia Freestyle.
What Is Nvidia Freestyle?

Freestyle is constructed into Nvidia’s GeForce Expertise, and it means that you can inject post-processing filters that alter how the graphics look in your display screen. Consider it sort of like Instagram filters in your video games: some are helpful, some add just a little pizazz to the picture, and a few are downright foolish. Listed here are a number of examples from throughout that vary:
- Brightness/Distinction: This allows you to modify the brightness and distinction, which may be helpful for those who’re taking part in a very darkish recreation that does not provide sufficient changes in its graphics settings.
- Colour: Do not just like the grim coloration palette of a recreation? Regulate its tint, temperature, or coloration vibrancy with this filter.
- Colorblind: Regulate the picture for colorblind customers, making it simpler to distinguish between sure shades.
- Particulars: This incorporates various filters that carry out the element of your recreation’s graphics, together with sharpening to reinforce blurry edges, bloom to offer it that mid-2000s vibe, and HDR firming for a pseudo-HDR impact. (There’s additionally a separate Sharpening filter that gives a bit extra management as properly.)
- Depth of Area: This lets you blur the background for a barely extra cinematic look, with changes on how deep you need it to go.
- Letterbox: Add black bars to the highest and backside or sides of the picture, additionally for a extra cinematic picture.
- Painterly: Decrease the element of the picture to create an nearly cartoony fashion.
- Stickers: Stick large emoji over the sport window. I am undecided why you’d need this, however it’s there.
There are lots extra, from filters that make your recreation seem like an previous film to at least one experimental filter that removes the HUD out of your display screen.
Since these are post-processing filters, it is best to have the ability to apply them with out an enormous hit to efficiency, although it does take a little bit of computational energy. The extra filters you add, the extra assets Freestyle would require, however except you are toeing the road of playability already, it most likely will not be tremendous noticeable.
Freestyle might sound like extra of a enjoyable novelty than something, however a few of these may be extremely helpful. The Sharpening filter particularly is nice for contemporary video games that overuse blurry anti-aliasing strategies, and among the lighting filters may help you see higher in darkish areas. Spend a couple of minutes looking out the online, and you will find dozens of threads from gamers showcasing their in-game filters for gaining one of the best benefit.
It would not have fairly as many helpful instruments as ReShade, a third-party software we have talked about earlier than, however Freestyle is constructed into the motive force, so that you needn’t set up something additional. Plus, you may add your individual ReShade filters to Freestyle for even additional customization. Give it a try to tinker round with third-party filters to see what you may create.
Learn how to Allow Nvidia Freestyle

To make use of Nvidia Freestyle, you will want an Nvidia graphics card and GeForce Expertise put in in your system. Be sure you’re working the most recent model of GeForce Expertise with up-to-date drivers. Then launch your favourite recreation, and press Alt+F3 to carry up the Recreation Filter sidebar. (You may as well press Alt+Z to carry up the GeForce Expertise overlay, then click on Recreation Filter.)
If the choices do not seem, you’ll have disabled the GeForce Expertise overlay previously—you may re-enable it by opening the GeForce Expertise app, clicking the Settings cog, and toggling In-Recreation Overlay again on. As well as, not all video games are supported, so strive one other title to see if it is a game-specific problem.
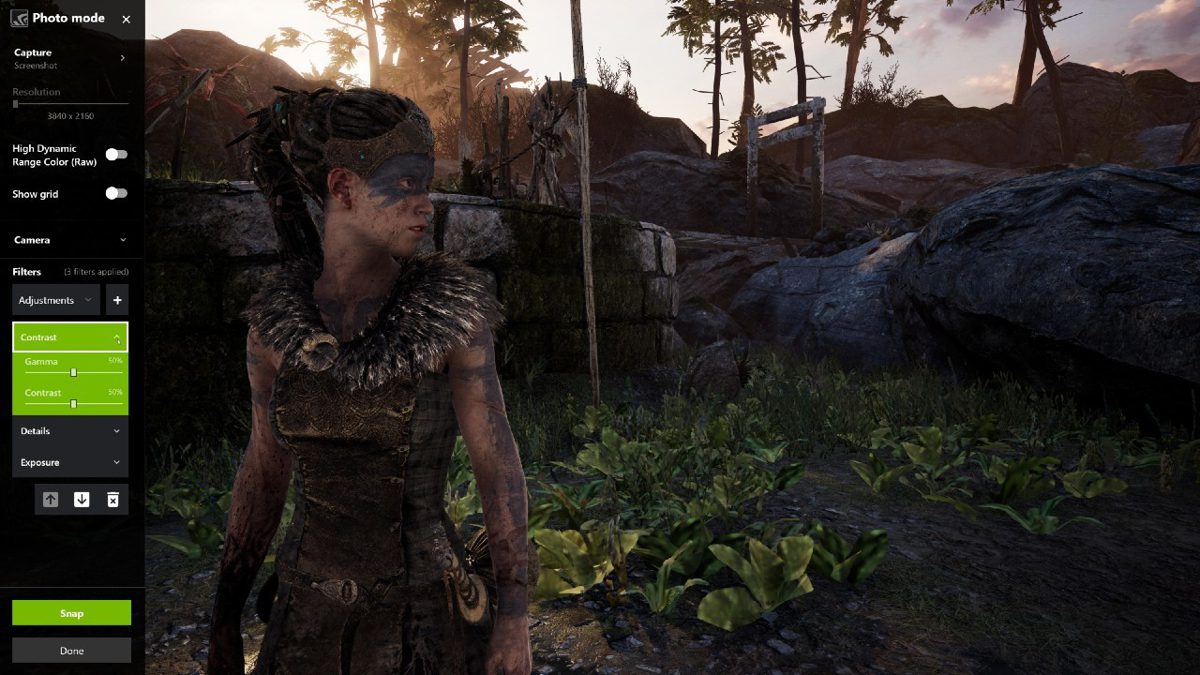
Within the Recreation Filter sidebar, look beneath Types—by default, this must be set to Off. You’ll be able to click on the numbers 1, 2, or 3 to start out making a filter preset. Then, choose a filter from the drop-down menu that seems, like Sharpening. It’s best to see it seem within the field beneath, and you may click on on it to disclose extra settings for that individual filter.
So as to add extra filters, simply click on the Plus signal, or you may choose a filter and press the trash can button to take away it. Bear in mind, the order of your filters issues, so use the arrows to re-prioritize them within the listing to regulate how your ultimate picture seems.
Whenever you’re completed, click on Accomplished, and revel in your recreation (hopefully with out an excessive amount of of a efficiency hit). You should utilize this to offer new taste to previous video games, shine a lightweight on element in darkish scenes, or craft the proper screenshot for sharing on social media. It is free and constructed proper in, so you don’t have anything to lose by making an attempt it out.
Source link